Recently I was looking for a class which could convert a System.Drawing.Image to byte[] array and vice versa.
After a lot of searching on Google, I realised that it would be faster for me to write this class and also share it.
The class which I wrote is called ImageConverter.cs. The class has two methods.
First method: Convert Image to byte[] array:
public byte[] imageToByteArray(System.Drawing.Image imageIn)
{
MemoryStream ms = new MemoryStream();
imageIn.Save(ms,System.Drawing.Imaging.ImageFormat.Gif);
return ms.ToArray();
}
This method uses the System.Drawing.Image.Save method to save the image to a memorystream. The memorystream can then be used to return a byte array using the ToArray() method in the MemoryStream class.
Second method: Convert byte[] array to Image:
public Image byteArrayToImage(byte[] byteArrayIn)
{
MemoryStream ms = new MemoryStream(byteArrayIn);
Image returnImage = Image.FromStream(ms);
return returnImage;
}
This method uses the Image.FromStream method in the Image class to create a method from a memorystream which has been created using a byte array. The image thus created is returned in this method.
The way I happen to use this method was to transport an image to a web service, by converting it to a byte array and vice-versa.
Hope this class is useful to all.
Monday, January 17, 2011
Monday, December 6, 2010
Asp.Net MVC Framework
Dear all here i am giving link of one of my favorite ASP.Net MVC Famework Book...... Hope so this will helps you.


Friday, October 15, 2010
Suppress Subreport
How to suppress a subreport of main report in Crystal Report.
Suppress a subreport if there are no record found.
I am not sure but you can't really suppress a subreport in runtime.
But you can follows following details and get required result.
My DataTable has an extra column that will tell me whether or not I have to suppress the subreport. Then while in CR designer, right click on the subreport you want to supress and select FORMAT. Check the suppress checkbox and then click on the formula button (X2). Within your script check for the column value:
if {YourDataTable.YourColumn} = "Value" then
true
else
false
Another way you can suppress your detail section of Crystal Report from code behind page of form where you display your report.
Private Sub Report_Load(ByVal sender As System.Object, ByVal e As System.EventArgs) Handles MyBase.Load
Try
Me.WindowState = FormWindowState.Maximized
Dim crt As New CrystalReport1
// ds is DataSet which is not empty means it has record
crt.SetDataSource(ds)
If (ds.Table(2).Rows.Count <= 0) Then
crt.ReportDefinition.Sections("DetailSection3").SectionFormat.EnableSuppress = True
End If
CrystalReportViewer1.ReportSource = crt
CrystalReportViewer1.Show()
Catch ex As Exception
Throw ex
End Try
End Sub
End Class
Hopefully these information will help you.
Thanks and regard
Sumedh Borkar
Thursday, September 23, 2010
DataTable - Adding, Modifying, Deleting, Filtering, Sorting rows
In this article, I am going to explain how to Add, Modify, Delete, Sort, Filter rows of the DataTable.
Introduction
DataTable is a central object in the ADO.NET library. If you are working with ADO.NET - accessing data from database, you can not escape from DataTable. Other objects that use DataTable are DataSet and DataView. In this tutorials, I will explain how to work with DataTable. I have tried to cover most of the frequently used activity in the DataTable, I hope you will like itCreating a DataTable
To create a DataTable, you need to use System.Data namespace, generally when you create a new class or page, it is included by default by the Visual Studio. Lets write following code to create a DataTable object. Here, I have pased a string as the DataTable name while creating DataTable object.// instantiate DataTable
DataTable dTable = new DataTable("Dynamically_Generated");
Creating Columns in the DataTable
To create column in the DataTable, you need to use DataColumn object. Instantiate the DataColumn object and pass column name and its data type as parameter. Then call add method of DataTable column and pass the DataColumn object as parameter.Specifying AutoIncrement column in the DataTable
To specify a column as AutoIncrement (naturally it should be an integer type of field only), you need to set some properties of the column like AutoIncrement, AutoIncrementSeed. See the code below, here I am setting the first column "AutoID" as autoincrement field. Whenever a new row will be added its value will automatically increase by 1 as I am specified AutoIncrementSeed value as 1.// specify it as auto increment field auto.AutoIncrement = true; auto.AutoIncrementSeed = 1; auto.ReadOnly = true;If you want a particular column to be a unique column ie. you don't want duplicate records into that column, then set its Unique property to true like below.
auto.Unique = true;
Specifying Primary Key column in the DataTable
To set the primary key column in the DataTable, you need to create arrays of column and store column you want as primary key for the DataTable and set its PrimaryKey property to the column arrays. See the code below. // create primary key on this field
DataColumn[] pK = new DataColumn[1];
pK[0] = auto;
dTable.PrimaryKey = pK;
Till now we have created the DataTable, now lets populate the DataTable with some data.
Populating data into DataTable
There are two ways to populate DataTable.Using DataRow object
Look at the code below, I have created a DataRow object above the loop and I am assiging its value to the dTable.NewRow() inside the loop. After specifying columns value, I am adding that row to the DataTable using dTable.Rows.Add method.
// populate the DataTable using DataRow objectDataRow row = null;
for (int i = 0; i < 5; i++)
{
     row = dTable.NewRow();
     row["AutoID"] = i + 1;
     row["Name"] = i + " - Ram";
     row["Address"] = "Ram Nagar, India - " + i;
     dTable.Rows.Add(row);}
Instead of using the column name, you can use ColumnIndex too, however it is not suggested as you might want to add a column in the mid of the table then you will need to change your code wherever you have specified the index of the column. Same applies while reading or writing values into Database column.
Asiging the value of column using Arrays
In following code, I have specified the values of every column as the array separated by comma (,) in the Add method of the dTable.Rows.
// manually adding rows using array of values
dTable.Rows.Add(6, "Manual Data - 1", "Manual Address - 1, USA");
dTable.Rows.Add(7, "Manual Data - 2", "Manual Address - 2, USA");
Modifying data into DataTable
Modifying Row DataTo edit the data of the row, sets its column value using row index or by specifying the column name. In below example, I am updating the 3rd row of the DataTable as I have specified the row index as 2 (dTable.Rows[2]).
// modify certain values into the DataTabledTable.Rows[2]["AutoID"] = 20;
dTable.Rows[2]["Name"] = "Modified";
dTable.Rows[2]["Address"] = "Modified Address";
dTable.AcceptChanges();
Deleting Row
To delete a row into DataTable, call the rows.Delete() method followed by AcceptChanges() method. AcceptChanges() method commits all the changes made by you to the DataTable. Here Row[1] is the index of the row, in this case 2nd row will be deleted as in collection (here rows collection) count start from 0.
// Delete row
dTable.Rows[1].Delete();
dTable.AcceptChanges();
Filtering data from DataTable
To filter records from the DataTable, use Select method and pass necessary filter expression. In below code, the 1st line will simply filter all rows whose AutoID value is greater than 5. The 2nd line of the code filters the DataTable whose AutoID value is greater than 5 after sorting it. DataRow[] rows = dTable.Select(" AutoID > 5"); DataRow[] rows1 = dTable.Select(" AutoID > 5", "AuotID ASC");
Note that Select method of the DataTable returns the array of rows that matche the filter expression. If you want to loop through all the filtered rows, you can use foreach loop as shown below. In this code, I am adding all the filtered rows into another DataTable.
foreach (DataRow thisRow in rows)
{
     // add values into the datatable
     dTable1.Rows.Add(thisRow.ItemArray);}
Working with Aggregate functions
We can use almost all aggregate functions with DataTable, however the syntax is bit different than standard SQL.
Suppose we need to get the maximum value of a particular column, we can get it in the following way.
DataRow[] rows22 = dTable.Select("AutoID = max(AutoID)");
string str = "MaxAutoID: " + rows22[0]["AutoID"].ToString();
To get the sum of a particular column, we can use Compute method of the DataTable. Compute method of the DataTable takes two argument. The first argument is the expression to compute and second is the filter to limit the rows that evaluate in the expression. If we don't want any filteration (if we need only the sum of the AutoID column for all rows), we can leave the second parameter as blank ("").
object objSum = dTable.Compute("sum(AutoID)", "AutoID > 7");
string sum = "Sum: " + objSum.ToString();
// To get sum of AutoID for all rows of the DataTable
object objSum = dTable.Compute("sum(AutoID)", "");
Sorting data of DataTable
Oops !. There is no direct way of sorting DataTable rows like filtering (Select method to filter DataRows).There are two ways you can do this.
Using DataView
See the code below. I have created a DataView object by passing my DataTable as parameter, so my DataView will have all the data of the DataTable. Now, simply call the Sort method of the DataView and pass the sort expression. Your DataView object have sorted records now, You can either directly specify the Source of the Data controls object like GridView, DataList to bind the data or if you need to loop through its data you can use ForEach loop as below.
// Sorting DataTableDataView dataView = new DataView(dTable); dataView.Sort = " AutoID DESC, Name DESC"; foreach (DataRowView view in dataView) {Response.Write(view["Address"].ToString());}
Using DataTable.Select() method
Yes, you can sort all the rows using Select method too provided you have not specified any filter expression. If you will specify the filter expression, ofcourse your rows will be sorted but filter will also be applied. A small drawback of this way of sorting is that it will return array of DataRows as descibed earlier so if you are planning to bind it to the Data controls like GridView or DataList you will have for form a DataTable by looping through because directly binding arrays of rows to the Data controls will not give desired results.
DataRow[] rows = dTable.Select("", "AutoID DESC");
// create columns for the DataTable
DataColumn auto = new DataColumn("AutoID", typeof(System.Int32));
dTable.Columns.Add(auto);
// create another column
DataColumn name = new DataColumn("Name", typeof(string));
dTable.Columns.Add(name);
// create one more column
DataColumn address = new DataColumn("Address", typeof(string));
dTable.Columns.Add(address);

Hope this article will be useful. If you have any question, comments or
suggestions, please respond to this article. Thank you very much for
reading it and Happy DataTable


Best Regards
Sumedh Borkar
.
Tuesday, February 2, 2010
Exporting Datagridview data into HTML page in Window Application using VB.Net
Here i am showing how to Exporting Datagridview data into HTML page in Window Application using VB.Net.
Follows following procedure as

Function SaveToHtml(ByVal strHTMLCodes As String, ByVal strFullPath As String) As Boolean
Follows following procedure as
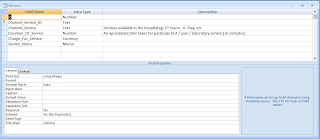
Create Database by name HMS.mdb in MS-Access
Now add new table with name “Services” and add field as follows

Now your table Services is successfully Created. Add few records in this table like as

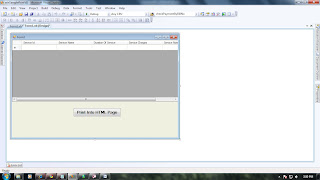
Now, we create Windows Application using VB.Net language for exporting datagridview data into a HTML page.
Design Form like as follows

Add following code in Form1.vb
'Add namespace
Imports System.Data.OleDb
'Global Declaration of variable as follows
Public cmd As OleDbCommand
Public da As OleDbDataAdapter
Private ds As DataSet = New DataSet()
Public con As OleDbConnection
Public con As OleDbConnection
Now add following code on page load event of this form Form1 i.e in Form1.vb as follows
'Form Load and display it containts
Private Sub Form1_Load(ByVal sender As System.Object, ByVal e As System.EventArgs) Handles MyBase.Load
Dim bRetVal As Boolean
Dim sSql As String
sSql = "select Channel_Service_ID,Channel_Service,Duration_Of_Service,Charge_For_Service,Service_Notes from Services;"
Try
bRetVal = getconnection()
If bRetVal Then
cmd = New OleDbCommand(sSql, con)
da = New OleDbDataAdapter(cmd)
da.Fill(ds, "tblServices")
If (ds.Tables(0).Rows.Count > 0) Then
DataGridView1.DataSource = ds.Tables("tblServices")
Dim columnCount As Integer = ds.Tables(0).Columns.Count
Dim gridViewWidth As Integer = DataGridView1.Width
Dim i As Integer
For i = 0 To DataGridView1.Columns.Count
Dim ColumnWidth As Integer = gridViewWidth / columnCount
DataGridView1.Columns(i).Width = ColumnWidth
Next
End If
Else
MessageBox.Show("Error in establishing connection ")
End If
Catch ex As Exception
MessageBox.Show("There is problem is occurred… ")
Finally
con.Close()
End Try
End Sub
For above code there is needed connection with database, this is done by getconnection() method. For this add following code in Form1.vb
'getconnection method which is connected with database. This open connection
Function getconnection() As Boolean
Dim bRetVal As Boolean
Dim conStr As String
con = New OleDbConnection("Provider=Microsoft.Jet.OLEDB.4.0; Data Source=" + Application.StartupPath + "\\Database\\HMS.mdb")
Try
con.Open()
'MessageBox.Show("Establishing connection....");
bRetVal = True
Catch ex As Exception
bRetVal = False
Finally
End Try
Return bRetVal
End Function
Now we add the code for exporting datagridview data into HTML page on button click event in Form1.vb as
Private Sub Button1_Click(ByVal sender As System.Object, ByVal e As System.EventArgs) Handles Button1.Click
Dim i As Integer
Dim strIcode, strDescri, strCat, nQty As String
Dim dCP, dSRP, dTCP, dTSRP As String
Dim strFName As String = "C:\Sumedh\CMS Files\Services Details.html"
Dim sHTML As String
If DataGridView1.RowCount = 0 Then Exit Sub
sHTML = "<html><head><title>Services Details Report</title></head>"
sHTML = sHTML & "<body><center><br>"
sHTML = sHTML + "<font size=5><b>Hospiatal Services</b></font><br>"
sHTML = sHTML + "<font size=3>Date: " + System.DateTime.Now.Date + "<br><br>"
sHTML = sHTML + "<table border=1 cellpadding=0 cellspacing=0>"
sHTML = sHTML + "<tr><td><b>Channel_Service_ID</td><td><b>Channel_Service</td><td><b>Charge_For_Service</td><td><b>Duration_Of_Service</td>" + "<td><b>Service_Notes</td></tr>"
For i = 0 To DataGridView1.RowCount - 1
strIcode = DataGridView1.Item("Channel_Service_ID", i).Value
strDescri = DataGridView1.Item("Channel_Service", i).Value
strCat = DataGridView1.Item("Charge_For_Service", i).Value
nQty = DataGridView1.Item("Duration_Of_Service", i).Value
dCP = DataGridView1.Item("Service_Notes", i).Value
sHTML = sHTML + "<tr><td>" + strIcode + "</td><td>" + strDescri + "</td><td>" + strCat + "</td>" + "<td>" + nQty + "</td><td>" + dCP + "</td></tr>"
Next
sHTML = sHTML & "</table></body></html>"
If FileIO.FileSystem.DirectoryExists("C:\") Then
SaveToHtml(sHTML, strFName)
Process.Start(strFName)
Else
MsgBox("Drive C does not exist. Please do make drive C available.", MsgBoxStyle.Information)
End If
'// StopProcess()
End Sub
Function SaveToHtml(ByVal strHTMLCodes As String, ByVal strFullPath As String) As Boolean
Dim objReader As IO.StreamWriter
If FileIO.FileSystem.DirectoryExists("C:\Services\Files") = False Then
FileIO.FileSystem.CreateDirectory("C:\ Services \Files")
End If
Try
objReader = New IO.StreamWriter(strFullPath)
objReader.Write(strHTMLCodes)
objReader.Close()
Return True
Catch ex As Exception
MsgBox(ex.Message, MsgBoxStyle.Information)
Return False
End Try
End Function
Save the entire application and run it. Check out the output result.
Saturday, January 30, 2010
Open PDF file in Asp.net using Vb.net on button click event
This example used the asp.net with vb.net coding.
Here i am upload the PDF file path which is already stored on server side hard drive and this file path store in string variable sPath and now i was click the one button from Asp.net page then the particular PDF is open.
Code is below:
Placed following code in button click event....
Dim client As New System.Net.WebClient()
Dim buffer As [Byte]() = client.DownloadData(sPath)
If buffer IsNot Nothing Then
Response.ContentType = "application/pdf"
Response.AddHeader("content-length", buffer.Length.ToString())
Response.BinaryWrite(buffer)
End If
Friday, January 29, 2010
How to retrieve image in gridview from the sql table (which is store as path in the table ) in Asp.net
You use an ImageField to display an image stored on the server’s hard drive. You can’t use
an ImageField to display images stored in a database table.
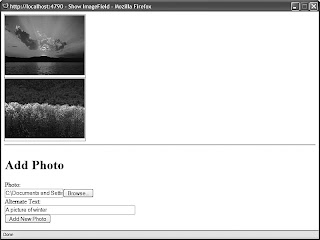
Following code shows how you can use the ImageField when creating a simple photo gallery
The GridView in above example contains an ImageField that looks like this:
<asp:ImageField
DataImageUrlField=”FileName”
DataImageUrlFormatString=”~/Photos/{0}”
DataAlternateTextField=”AltText”
ControlStyle-Width=”200px” />
The DataImageUrlField property contains the name of a field from the data source that
represents the path to an image on the server hard drive. The DataImageUrlFormatString
enables you to format this path. Finally, the DataAlternateTextField enables you to
specify the value of the alt attribute used by the <img> tag.
An ImageField supports the following properties:
. AlternateText—Enables you to specify fixed alternate text.
. DataAlternateTextField—Enables you to specify a field that represents the
alternate text.
. DataAlternateTextFormatString—Enables you to format the alternate text.
. DataImageUrlField—Enables you to specify a field that represents the image path.
. DataImageUrlFormatString—Enables you to format the image path.
. NullImageUrl—Enables you to specify an alternate image when the
DataImageUrlField is Nothing (null).
Following code shows how you can use the ImageField when creating a simple photo gallery

Using an ImageField with the GridView control.
Code For Above Diagram and check example code:
<%@ Page Language="C#" %>
<!DOCTYPE html PUBLIC "-//W3C//DTD XHTML 1.1//EN" "http://www.w3.org/TR/xhtml11/DTD/xhtml11.dtd">
<script runat="server">
protected void frmPhoto_ItemInserting(object sender, FormViewInsertEventArgs e)
{
// Get the FileUpload control
FileUpload upPhoto = (FileUpload)frmPhoto.FindControl("upPhoto");
srcImages.InsertParameters["FileName"].DefaultValue = upPhoto.FileName;
string savePath = MapPath("~/Photos/" + upPhoto.FileName);
// Save contents to file system
upPhoto.SaveAs(savePath);
}
protected void frmPhoto_PageIndexChanging(object sender, FormViewPageEventArgs e)
{
}
</script>
<html xmlns="http://www.w3.org/1999/xhtml" >
<head id="Head1" runat="server">
<title>Show ImageField</title>
</head>
<body>
<form id="form1" runat="server">
<div>
<asp:GridView
id="grdImages"
DataSourceID="srcImages"
AutoGenerateColumns="false"
ShowHeader="false"
Runat="server">
<Columns>
<asp:ImageField
DataImageUrlField="FileName"
DataImageUrlFormatString="~/Photos/{0}"
DataAlternateTextField="AltText"
ControlStyle-Width="200px" />
</Columns>
</asp:GridView>
<asp:SqlDataSource
id="srcImages"
ConnectionString="<%$ ConnectionStrings:Photos %>"
SelectCommand="SELECT FileName, AltText FROM Photos"
InsertCommand="INSERT Photos (FileName, AltText)
VALUES (@FileName, @AltText)"
Runat="server">
<InsertParameters>
<asp:Parameter Name="FileName" />
</InsertParameters>
</asp:SqlDataSource>
<hr />
<asp:FormView
id="frmPhoto"
DefaultMode="Insert"
DataSourceID="srcImages"
OnItemInserting="frmPhoto_ItemInserting"
Runat="server" onpageindexchanging="frmPhoto_PageIndexChanging">
<InsertItemTemplate>
<h1>Add Photo</h1>
<asp:Label
id="lblPhoto"
Text="Photo:"
AssociatedControlID="upPhoto"
Runat="server" />
<br />
<asp:FileUpload
id="upPhoto" Runat="server" />
<br />
<asp:Label
id="lblAltText"
Text="Alternate Text:"
AssociatedControlID="txtAltText"
Runat="server" />
<br />
<asp:TextBox
id="txtAltText"
Text='<%# Bind("AltText") %>'
Columns="50"
Runat="server" />
<br />
<asp:Button
id="btnInsert"
Text="Add New Photo"
CommandName="Insert"
Runat="server" />
</InsertItemTemplate>
</asp:FormView>
</div>
</form>
</body>
</html>
-----------------------------------------------------------------------------------
The GridView in above example contains an ImageField that looks like this:
<asp:ImageField
DataImageUrlField=”FileName”
DataImageUrlFormatString=”~/Photos/{0}”
DataAlternateTextField=”AltText”
ControlStyle-Width=”200px” />
The DataImageUrlField property contains the name of a field from the data source that
represents the path to an image on the server hard drive. The DataImageUrlFormatString
enables you to format this path. Finally, the DataAlternateTextField enables you to
specify the value of the alt attribute used by the <img> tag.
An ImageField supports the following properties:
. AlternateText—Enables you to specify fixed alternate text.
. DataAlternateTextField—Enables you to specify a field that represents the
alternate text.
. DataAlternateTextFormatString—Enables you to format the alternate text.
. DataImageUrlField—Enables you to specify a field that represents the image path.
. DataImageUrlFormatString—Enables you to format the image path.
. NullImageUrl—Enables you to specify an alternate image when the
DataImageUrlField is Nothing (null).
Subscribe to:
Posts (Atom)